This article is about using the “Record Takes to Layers” feature in Presonus Studio One (version 3.5.4) when recording Audio and MIDI via USB from the Roland TD-25 module, and will also be relevant for those using other Roland V-Drums modules which have direct out USB Audio and MIDI recording capabilities (eg the TD-30).
The ability to record Audio and MIDI via USB direct from the Roland TD-25 module to your DAW is an excellent feature, very useful for having options later to, say, playback the recorded MIDI through EZDrummer, Addictive Drums, or SSD, etc.
However, like me, you may have had some unexpected results when recording Audio and MIDI simultaneously when using Studio One’s Takes to Layers functionality, which this article will help you address.
The problem with Studio One’s Takes to Layers is that it treats Audio and MIDI in slightly different ways, which can be both confusing and frustrating until you understand what’s going on and how to work around its limitations. Additionally, Studio One’s various Record options are not very intuitive in the first place, which doesn’t help.
Understanding how Studio One handles MIDI events
The big difference between Studio One and other DAWs out there is that MIDI events in Studio One are not saved as separate .mid files, but are saved within the Studio One Song file itself. Therefore, having recorded some MIDI you won’t find any corresponding MIDI files in the browser Pool.
The second issue – which I would say is an oversight by Presonus – is that MIDI events created via Record Takes to Layers do not get unique identifying event names, unlike Audio Takes which do. (I discuss how to deal with this in my Working with Studio One MIDI Events article.)
Finally, Presonus has made some assumptions about how and why users record MIDI, which are not very helpful in the context of recording multiple MIDI takes from the TD-25 (or similar sources). I would say that the Instrument recording options (“Instrument” being the source generating the MIDI data, in our case the TD-25) have been designed primarily for those who want to build up complex MIDI parts within a single MIDI event, for example for those building up a drum part, recording first the kick, then the snare, then the hi-hats, etc. Clearly, this isn’t generally the way a user would want to record MIDI from a TD-25.
Let’s cut to the chase
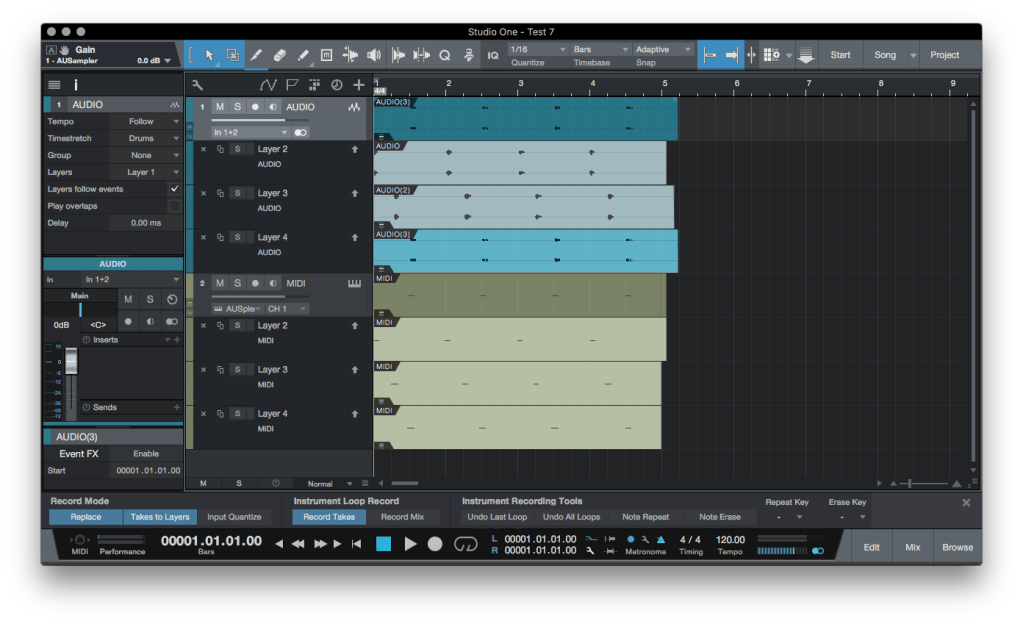
The key to getting Record Takes to Layers to work as expected when recording Audio and MIDI simultaneously is to ensure that you have the correct Record Panel options selected. Specifically, it is the Record Panel’s Record Mode options which matter, as these affect both Audio and MIDI recording, and NOT the Instrument Loop Record options, which are only relevant when recording MIDI Takes within a continuously repeating Loop.
What is this “Record Takes to Layers” you speak of? Studio One has the capability of recording multiple takes of the same source on a single Track in the DAW, automatically recording each each Take to a new Layer for that Track. Although designed primarily for allowing easier comping of multiple takes into a single take, I find it quite useful for file management purposes and for decluttering the Studio One Arrange and Mix screens.
To access the Record options mentioned earlier, we need to open the Record Panel (which is probably closed by default).
Studio One Record Panel
To open the Record Panel, click on the little spanner icon to the right of the Loop position markers (spanner icon circled in red in below screenshot):

Once the Record Panel is open, you should see something like this:

The ONLY options of interest, in the context of simultaneously recording Audio and MIDI from the TD-25, are the Record Mode “Replace” and “Takes to Layers” buttons. You can ignore all the rest, although I always leave “Input Quantize” off, as I want to record exactly what I played, not a quantized version.
Replace – This means that each take will overwrite the previous take. In the case of Audio, this isn’t important as a separate audio file is created and saved for each take (and will be available in the Pool for future use). All that will happen is that only the latest take will be visible in the Arrange window. However, for MIDI recording this option IS crucial:
- Replace OFF – The MIDI data generated during each take will be added to the previously recorded data and stored in the same MIDI event. This is bad news if you’re recording multiple takes and you want to save each one individually.
- Replace ON – Only the MIDI data generated from the latest take will be stored in the MIDI event. This is exactly what we want.
Takes to Layers – As mentioned earlier, each take will be stored in a separate Layer associated with the DAW track in question. This is what we want, so this option should be on, ie activated.
Instrument Loop Record has two options “Record Takes” and “Record Mix”, which can be toggled between. For our purposes, it makes NO difference which of the two is selected – it really doesn’t matter. Instrument Recording Tools options can also be ignored as they have no impact on what we are trying to do. I suggest leaving these deactivated.
Which Record Panel options to use?
Simple. To simultaneously record Audio and MIDI from the TD-25 to separate Layers of Audio and MIDI, make sure your Record Panel options are set up like this:

The key options are Replace and Takes to Layers, both of which must be activated. None of the Instrument Loop Record or Instrument Recording Tools options matter and can be safely ignored.
IMPORTANT: I was a little unfair to Presonus earlier in this article as, frankly, part of the confusion I had suffered was due to me not understanding that the Record Mode Replace and Takes To Layers options apply to BOTH Audio and MIDI. I had wrongly assumed that they only applied to Audio – which is not the case. I had also assumed that the Instrument Loop Record options applied to all MIDI recording, whereas in fact they ONLY apply to MIDI recording when in Loop mode. When not using a Loop, these options do not apply and can be ignored.
Conclusion
The Takes to Layers feature is really useful when recording Audio and MIDI simultaneously from the TD-25 into Studio One. However, if the correct Record Mode options are not selected, unexpected results can occur, which can be confusing and frustrating. Hopefully this article will avoid you having to suffer the same frustrations that I suffered until I figured this all out!
To learn more about Studio One’s Record Mode options, check out my Studio One Record Mode Options Examples article, packed with useful screenshots to illustrate what each option does.

Leave a comment