Category: Blog

  • Final Cut Pro X Workflow

    Final Cut Pro X Workflow

    I thought I would share the workflow I use for managing Final Cut Pro X Libraries, Events and Projects. Having an organised and methodical system really helps to keep on top of the huge number of video, audio and other files that video-making generates.

    Unfortunately, like many of us new to FCPX or other video NLE’s, I didn’t have a system and ended up with media all over the place, every project handled differently, and never really knew where or what anything was for or how I had used it.

    Disclaimer: This is not “the best” method, just one that works for me, which has made file management much easier and improved my productivity.

    I now have a logical organisation for each FCPX project and its associated media files, thanks to me finally understanding three important points about how FCPX Libraries and Events work.

    FCPX Libraries

    Libraries in FCPX can be stored anywhere on your system, and we can have as many Libraries as we need for managing our projects.  An early rookie mistake I made was to use one Library for everything. A single Library becomes huge, unmanageable, slows down the computer, and finding stuff becomes a headache.

    FCPX Events

    FCPX Events make more sense when we think of them as special types of folders, rather than “events” in the traditional sense. This means we can create as many Events as we need within the Library, for managing the different types of media we may be handling in our project. (Note: when I mention “project” in lowercase, I mean the “thing” we’re making, be it a video, film, etc, not to be confused with FCPX’s Projects, which mean something specific in the context of FCPX.)

    Leave media in place or save it in the Library?

    When it comes to media handling, FCPX can work in one of two ways (or a mix of both): either we can import media into the Library, so that it physically becomes part of the Library file, or we can leave it in our computer’s folder structure in whatever way that makes sense to us and just tell FCPX where it is. We can do either, or both – whatever makes sense for us. Having a consistent approach to whether or not files are physically stored in the Library really helps media management.

    Let’s look at the steps I go through each time I create a new FCPX project.

    1. Setting up the folders on my hard drive

    I think this is key. Get this right, ie by using a consistent structure of folders for projects, and half the battle is won.

    All my projects are stored in a “_PROJECTS” folder on my external hard drive, with a sub-folder for each “project”. I use a strict naming convention for these folders, comprising the date of the shoot (plus an index number if more than one shoot on the same day, which is rare) and some keywords to help me know which project I’m looking at, usually the artist and abbreviated song title.

    FCPX Mac Folder Projects
    Each project gets its own sub-folder, named using a combination of the date of the shoot, and artist and song title.

    Here you can see three projects, all shot in 2018. The “DC” in the filename is just to remind me that this is a drum cover, the rest of the name is pretty self-explanatory.

    Within each of these “project” folders I create various sub-folders for holding the media related to that project.

    FCPX Mac Folder Projects - Subfolders
    Sub-folders created within each video project folder

    Folder structure within each project folder:

    • Audio – For the final audio mixes created in Presonus Studio One.
    • Final Render Assets – For all other media, other than video and the final audio, related to the project. For example, the screengrab I will use for the video thumbnail, its associated Photoshop file, and any other stills and logos that I may use.
    • Final Renders – Contains the final renders exported from FCPX for publication.
    • ORIG Footage – This where I import all video files directly from my cameras, using the OSX Image Transfer utility. There are sub-folders within this folder, one for each camera used on the shoot.
    • ORIG Footage Not Used – I use this for temporarily storing the videos of takes I won’t work on (due to a playing mistake or other issue). These are not imported into FCPX, and are kept purely “just in case”. Usually, once I’ve finished the project and rendered the final files, I delete everything in this folder as I will never use these files.

    2. Offloading media from the cameras

    Now that the project folder and its sub-folders have been set up, I can import the video files from the cameras using Image Transfer. (Importing to FCPX will come later.)

    As mentioned, each camera gets its own folder within the ORIG Footage folder. This is very handy when we come to importing into FCPX, as FCPX will use the camera folder name to automatically create a keyword within the Event the media has been imported to. But I’m getting ahead of myself.

    FCPX Mac Folder Projects - Subfolders - Cameras
    Each camera used in the shoot gets its own folder

    By using Image Transfer, rather than offloading via FCPX, I can review the footage before deciding which take I’m going to keep, and also rename all the files so that I know what is what. As I generally shoot a drum cover with multiple cameras, I need to keep track of which video files go with which audio take. How I organise audio takes in Studio One is a subject for another article, so I won’t go into details, other than to say that each take will be named “AUD-01”, “AUD-02”, etc. I like to prefix the video filename with the audio take number, which is helpful once the video files are imported into FCPX, as video files related to the same audio take will appear together in the file list in the FCPX Browser window.

    Unwanted takes are moved to the ORIG Footage – Do not use folder, for deletion once the project is finished. In other words, only the video files for the best take will stay in the ORIG Footage folder.

    At this stage I will also track down any other media I need and move these files to the Final Render Assets folder. Typically, this will be the Photoshop file I use for creating the Youtube thumbnail. I will also FCPX screen grabs to this folder. The final audio mix files created in Studio One will be saved in the Audio sub-folder.

    3. Creating the FCPX Library

    Now that all the media is where I want it on the hard drive, the next step is to open up FCPX and create a new Library.

    I name the Library the same as the project folder (eg “180810 DC Garbage Paranoid”), and save it in the root of the project folder. I use one FCPX Library per project, and save each Library in its relevant project folder.

    FCPX Mac Folder Projects - Subfolders - Library
    FCPX Library created for each project and saved in the relevant project folder.

    The beauty of this is that I now have everything in one place on my hard drive, so can easily backup or archive the entire project to another drive by copying the project sub-folder and its contents. This means that each Library and all its media are self-contained and I can move them around, transfer them to another machine, or even give them to someone else to work on, etc. Very practical.

    4. Creating the FCPX Events

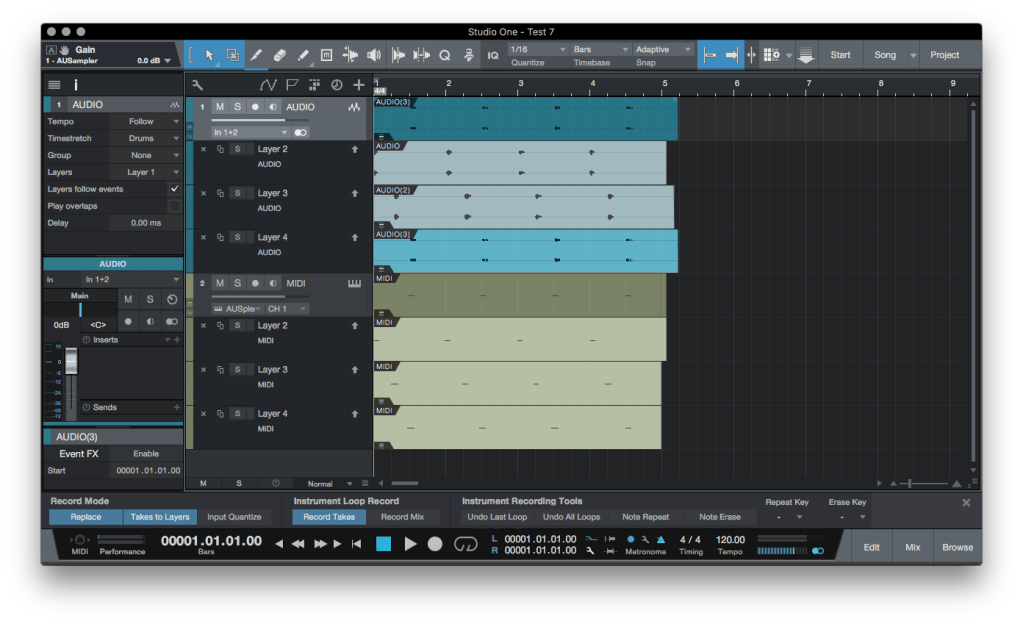
    Now the Library is created, I will set up the Events that I use for organising the media within FCPX, using a structure and naming convention that mirrors the hard drive folder structure created previously.

    FCPX Setting up Events to match the project folder structure
    FCPX Setting up Events to match the project folder structure

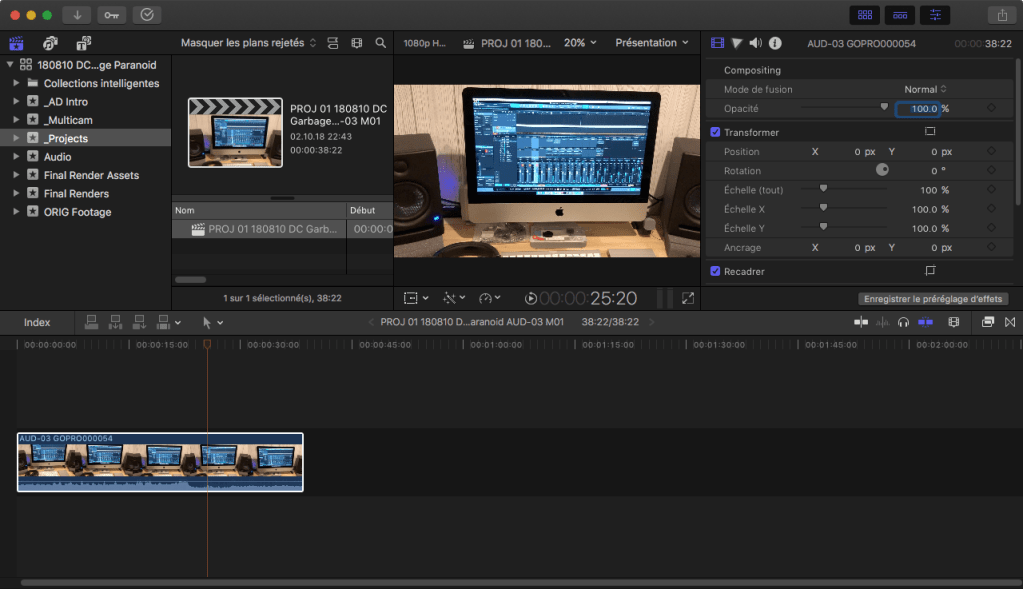
    In the screenshot you can see that I’ve created Events with the same names as the folders created earlier. However, as I will not import video files related to bad takes, I don’t create an “ORIG Footage – Do not use” Event as it won’t be of any use to me in FCPX.

    To finish off the setting up the Events, I create two additional Events unrelated to the folder structure on the hard drive. The _Projects Event is where I will keep all the FCPX Projects used in this Library. The _Multicam Event is where I keep the Multicam clips that I will create from the raw footage. Why will there be more than one Project and one Multicam? Because I may create subsequent versions of the Project, or decide to work on more than one take, so having these dedicated Events is very helpful in keeping things organised.

    FCPX Events set up ready for use
    FCPX Events set up ready for use

    The AD Intro Event is a special case. I use a short intro clip at the beginning of each video, and this clip was created in FCPX with its own Library. Within this Library I have an Event called AD Intro which contains the final render of this clip. I simply copy this AD Intro event into each new project Library and store the underlying files in the new project Library. This probably sounds more complicated than it really is, so I hope it makes sense. The key plus in doing this is that I can manage the intro clip within FCPX Libraries and don’t have to worry about where to keep the relevant files – they are just copied into the new Library. The only down side is that this does increase the size of the Library and uses up a bit of hard disk space, but the intro clip is short, so this isn’t a big issue.

    5. Creating the FCPX Projects

    The final stage of setting up the Library is to create a Project so that I can start editing and putting the final film together.

    I use a strict naming convention for each Project so that I know which recording take it relates to, together with a version number in case I create several versions of the Project. For example: PROJ 180810 DC Garbage Paranoid AUD-03 v1

    AUD-03 tells me that this Project contains footage of recording take #3, and v1 tells me that this is the first version of this Project. If at a later date I decide to re-cut the video, I will create a new version and name it v2, etc.

    Why keep Projects in a separate Event?

    Usually, FCPX expects Projects to be created within Events. However, they can be kept anywhere within the Library, and as each Library has several Events I prefer to keep them in a dedicated Event where I know I can easily find them. This is the kind of flexibility I really like about Final Cut Pro X.

    6. Importing the media into FCPX

    The final stage is to open up the FCPX media import window and import the media into the relevant Events.

    In another post I will go through my workflow from here through to rendering the final video.


  • Hi-hat Microphone Mount

    Hi-hat Microphone Mount

    A quick review of the Big Bang Distribution Mic Mount, a really useful solution for miking up your hi-hat – without having another mic stand to cluttering up valuable studio floorspace.

    It’s a simple design, but quite cleverly thought out, comprising a bracket for clamping the mounting arm to the hi-hat stand, and the mounting arm itself, which is height adjustable to provide enough room to mount a wide range of microphones.

    Big Bang Distribution Mic Mount and Rycote shockmount

    The only adjustability, apart from moving the main clamp up or down the hi-hat stand main tube, is the vertical extension bar (which the mic clip mounts on) giving approximately 10-12 cms additional height. However, there is no means of adjusting the horizontal width of the mounting arm, although I estimate that it could manage up to 17″ hi-hats, for those that like big hats.

    Side view of Mic Mount showing mounting bracket

    Another slightly negative point is that the main mounting bracket which clamps to the hi-stand stand is not quick-release, so there is some fiddling about with the bolts and washers each time you need to remove or re-mount it. Likewise, the vertical extension bar requires a drum key to unlock/lock the two bolts holding this bar in position. On the other hand, in a permanent, studio set-up, these are very minor points and should not put you off.

    Mic Mount for hi-hats, from Big Bang Distribution

    Overall, the build quality is pretty good, and certainly perfectly acceptable for the price (I think I paid around US$ 35 plus shipping).

    The Mic Mount in Action

    Digging out my AKG C451 small diaphragm condensor microphone and mounting it to the Mic Mount took only a couple of minutes. I did have to use a 5/8″ female to 3/8″ male adaptor as the mic clip supplied with the C451 has a 3/8″ thread whereas the Mic Mount is 5/8″ – but you won’t need to if your mic clip has a 5/8″ thread.

    I did wonder about the mechanical transmission of noise to the mic, especially when doing lots of left foot pedal action, or really laying into sloshy open hats. Luckily, I had a rather nice Rycote shockmount clip lying around, and was therefore able to do some test recordings comparing the Rycote vs the standard solid plastic AKG clip.

    Why you need a shockmount

    Here are the recordings using both types of mic clip, with me playing a small variety of closed, open and pedalled hi-hat chicks.

    Standard solid plastic AKG mic clip

    Rycote Shockmount

    The difference is really obvious during the sections where I am laying into the open hats or pedalling, with a nasty rumble transmitted from the hi-hat stand to the microphone when using a standard solid mic clip like the one supplied with the AKG. The Rycote, on the other hand, was fantastic at isolating the mic and preventing any of this nastiness from reaching the mic capsule. I think this test shows just how good the Rycote shockmount is.

    Conclusion

    The conclusion is obvious: use a decent quality shockmount. Other than that, I think the Mic Mount is an excellent product, well worth its very reasonable asking price, and a great spacesaver when recording in a small room/studio.


  • Kick drum beaters – weight comparison

    Kick drum beaters – weight comparison

    Like nearly every other drummer out there, I have spent a fair amount of time fussing and fretting over my kick pedal, playing with the spring tension, beater angle, footboard angle – you name it, I’ve tweaked it. Each of us likes a particular feel from the pedal, and a lighter or heavier beater can quite drastically change that feel.

    Updated 26 December 2018

    Ok, but how to know which beaters are lighter or heavier, you ask. Good question. Some manufacturers do quote weights, especially for models that are specifically marketed as being very lightweight or heavy. However, based on the small collection of beaters I have accumulated (DW, Tama and Pearl), most of them have no weight info on their packaging or on the maker’s web site. So, I got out the kitchen digital scales and weighed them. Here are the results, from lightest to heaviest.

    Pearl DB100 Double beater

    Supplied stock with my Pearl Eliminator P-2050c pedal (the “Redline” version).

    • Weight : 84g
    • Beater material : Dual surfaces – Felt and Plastic

    Pearl DB100 supplied with P-2050c Eliminator pedal

    Pearl B250QB Control Core Quad Beater

    • Weight 89g
    • Beater material: Felt and plastic

    This has 4 different playing surfaces plus a moveable counterweight. Pearl claims that the “Control Core” construction gives better shock absorption capabilities. Personally, I don’t notice any difference to the Pearl DB100 in that respect.

    Pearl B250QB Control Core Quad Beater

    Tama CB900PS Power Strike

    • Weight : 89g
    • Beater material : Felt

    Described as being for Tama’s Iron Cobra pedal, this beater can also be used with Speed Cobras.

    Tama CB900PS Power Strike beater

    DW SM101 Air

    Very similar to the stock beater supplied with the DW 9000, but lighter weight. I currently use this with my DW 9000. However, this beater is only 8g lighter than the stock SM101 beater. Personally, I don’t feel much difference.

    • Weight : 97g
    • Beater material : Dual surfaces – Felt and Plastic

    DW SM101 Air Kick Drum beater

    Tama PB90F Felt beater for Speed Cobra

    • Weight : 101g
    • Beater material : Felt

    Tama PB90F Felt Beater Speed Cobra

    DW SM104W Black Sheep (Rich Redmond)

    This is the Rich Redmond signature beater from DW, featuring a black stained wooden beater, moveable weight, and a removable black fleece beater cover.

    • Weight : 103g (without fleece cover)
    • Weight :108g (with fleece cover)
    • Beater material : Wood

    DW SM104W Black Sheep KIck drum beater (Rich Redmond), without fleece cover

    DW SM104W Black Sheep KIck drum beater (Rich Redmond), with fleece cover

    DW SM101 – Stock 9000 beater

    This is the beater supplied with the DW 9000 pedal.

    • Weight : 105g
    • Beater material : Dual surfaces – Felt and Plastic

    DW SM101 Beater - included with DW 9000

    DW SM110XL Beater

    • Weight : 122g (82g without the weights)
    • Beater material : Dual surfaces – Felt and Wood

    At more than three times the price of some of the other beaters shown here, this is perhaps DW’s flagship replacement beater. Large striking area, interchangeable felt and wooden strike surfaces, and removable weights (4 x 10g brass weights), the latter providing plenty of customization possibilites for those that need the ultimate in tweakability. For the average drummer, probably overkill!

    DW SM110 XL Control Beater

    Pedal feels slow? Try a lighter beater. Pedal lacks some punch? Try a heavier one.

    Conclusions

    With the lightest at 84g and the heaviest at 122g, there is quite a wide range of weights here, the heaviest (DW SM110XL) weighing 50% more than than the lightest (Pearl DB100).

    The low weight of the Pearl was a bit of a surprise as it is a physically large beater head, so I was expecting it to weigh more. But looks can be, and clearly are in this case, deceiving.

    In terms of flexibility, there’s much to be said for the DW SM110XL, thanks to its removable weights. Once all weights are removed, this would be the lightest beater in this comparison, albeit by a tiny 2g. Personally, I would prefer this pedal to have the option of a plastic pad, rather than wood, although many great drummers swear by wooden beaters.

    It should also be mentioned that some of these pedals come with a movable weight, and that the position of this weight along the shaft (closer or further away from the beater) will have a significant effect on the perceived heaviness and power of the beater when in use.

    Given that all the great drummers have their own preferences, yet still sound amazing, we probably shouldn’t get too hung up on this sort of thing. It was a fun exercise to do, and interesting to see the results, but at the end of the day it’s technique that counts – not the gear.

  • Natal Originals in the studio

    Natal Originals in the studio

    Been doing a lot of work recording and filming recently, and couldn’t resist posting this.

    Natal Originals Birch kit in the studio

    • Kick 22 x 18
    • Rack Tom 12 x 9
    • Floor Tom 14 x 12
    • Floor Tom 16 x 14
    • Gretsch Taylor Hawkins Snare
  • Studio One Record Mode Options

    Studio One Record Mode Options

    An explanation of the various Presonus Studio One’s Record Mode options, particularly relevant for those working with the Takes to Layers feature when recording Audio and MIDI simultaneously.

    If you have seen my Studio One – Takes to Layers – MIDI article, you will know that I had been struggling a little to understand how Studio One handles MIDI when recording Audio and MIDI via USB from my Roland TD-25 drum module. Thanks to some extensive testing with real examples, I was able to work out was going on and understand, at last, exactly how those Record Mode options affect the MIDI and Audio results obtained. This article is me sharing with you the results of those tests, which should help those who obtain unexpected results and are not quite sure how to get the results they want.

    The Context

    Here’s my scenario: I want to record Audio and MIDI simultaneously from my Roland TD-25 module, and use Studio One’s Takes to Layers feature to be able to easily work with multiple takes of, for example, playing along to a song.

    The Problem

    Without the correct Record Mode options selected, the new MIDI event created with each recording take contained all the MIDI data from earlier takes. Not what I wanted at all, and a complete mess!

    How I did the tests

    In Studio One’s Arrange window, I set up one Audio track (stereo) and one Instrument track. As I was thousands of miles (yes, really) from my TD-25, with only my Macbook to hand, I used the Macbook’s built-in microphone to record my voice, and Studio One’s built-in QWERTY MIDI keyboard to simultaneously generate some MIDI notes while recording my voice.

    Studio One’s built-in QWERTY MIDI input feature is really handy for those times when you need to create some MIDI but don’t have a MIDI keyboard or other input device to hand to plug into your computer. Check out my Studio One QWERTY MIDI Keyboard article to find out how to set it up and use it.

    I then set up Takes to Layers in the Record Panel, activated the metronome with 1 measure of Pre Count, 4/4 time signature and 120 bpm, and recorded 3 takes, each 4 measures long:

    • Take 1 = Audio and MIDI source played only on beat 1 of each measure
    • Take 2 = Audio and MIDI source played only on beat 2 of each measure
    • Take 3 = Audio and MIDI source played only on beat 3 of each measure

    I created various versions of the above, each with a different combination of Record Mode options selected, and grabbed a full screenshot of the Studio One window showing the resulting Audio and MIDI events, and the Record Mode options selected for that particular test.

    The Results

    (I have only posted relevant tests, hence the Test numbering might seem a bit strange. Don’t worry about this, I only mention the Test numbers to make it clearer which screenshot is which.)

    Test 6 – Record Mode options:

    • Replace – Deactivated
    • Takes to Layers – Activated

    Studio One - Takes to Layers - Record Mode option Example - Test-6

    As can be seen above, the Audio takes look exactly as expected, ie first take (Layer 2) has recorded my voice on beat 1 of each measure, the second take (Layer 3) has my voice on beat 2 of each measure, and the third take has my voice on beat 3 of each measure, the MIDI takes are not the same. Instead, the first take (Layer 2) is as expected, ie one note on beat 1 of each measure, but the second and third takes (Layer 3 and 4) have simply added the new notes to what is already there from the previous takes. Not at all what I want.

    Test 7 – Record Mode options:

    • Replace – Activated
    • Takes to Layers – Activated

    Studio One - Takes to Layers - Example - Test-7

    Hooray! Working as expected. The MIDI takes now exactly mimic the Audio takes, with each take only containing the notes actually played during that take.

    The most important point to understand is that the Record Mode options affect BOTH Audio and MIDI, therefore we must activate Record Mode option “Replace” to stop the new MIDI take accumulating all the MIDI data recorded in earlier takes.

    What about Instrument Loop Record?

    The Instrument Loop Record options ONLY affect takes recorded while looping through a section of the song, ie when setting Loop L and R points and activating the Loop. In my context of recording a play along to a complete song, I’m not using Loop Record, therefore these settings have no effect. Here are a couple of screenshots to demonstrate this.

    Test 2: Instrument Loop Record – Record Takes activated

    Studio One - Takes to Layers - Example - Test-2

    Test 8: Instrument Loop Record – Record Mix activated

    Studio One - Takes to Layers - Example - Test-8

    As can be seen looking at the two screenshots above, each have different Instrument Loop Record options set, but both sets of recordings have the same result: each MIDI take is correctly recorded as a discrete take, with no accumulation of MIDI date from one take to the next.

  • Gauger Percussion Flex Frame

    Gauger Percussion Flex Frame

    Mounting a rack tom on a snare stand gives added flexibility in positioning the tom, and in my opinion looks cool, but the downside for me was a choked sound. Fitting a Gauger Percussion Flex Frame has cured that and now I have a loud and resonant tom again! Highly recommended.

    Although I use a top of the range (and expensive) DW 9399 Tom/Snare stand for mounting my 12″ rack tom, in preference to hanging the tom off a cymbal stand, this type of mounting arrangement can really choke the sound of the tom. I was always careful to not clamp the tom in the stand’s basket, the tom just sitting there held in place by gravity, and even though the DW 9399 is fitted with additional isolation pads on the basket arms, the tom never sounded full and resonant.

    The Gauger Percussion Flex Frame (no affiliation) comprises a metal ring (the Frame), nicely finished in a hardwearing powder coating, and 6 plastic clips for mounting the frame to the drum. I have the 12″ version, which comes with 6 clips (other sizes come with additional clips as needed), and also bought a spare set of 6 clips just in case they don’t stand up to wear and tear when changing heads, tuning, etc. The whole lot cost me under $50, which I thought was reasonable.

    Gauger Flex-Frame Tom - Close-up of mounting clip

    Mounting the Flex Frame took only a few minutes (including re-tuning the resonant head), and is a simple matter of loosening off the tension rods, sliding in the mounting clips, tightening up the rods and re-tuning the head, then finally clipping the Frame itself into the clips. Really, a 5 to 10 minute job max.

    Gauger Flex-Frame Tom - Close-up of mounting clip

    The diameter of the Frame is a little larger than the drum hoop, but in my case doesn’t extend beyond the lugs, so shouldn’t be problem for those needing to pack their tom in a case – the drum will fit in its case with the Frame fitted.

    Gauger Flex-Frame - Frame held by snare stand

    Does it work? Yes it does. I noticed an immediate improvement in sound, with all choking gone, and the tom now sounds how it should – full and resonant. Probably the best $50 I’ve spent on drum gear.


  • Studio One – Takes to Layers – MIDI

    Studio One – Takes to Layers – MIDI

    This article is about using the “Record Takes to Layers” feature in Presonus Studio One (version 3.5.4) when recording Audio and MIDI via USB from the Roland TD-25 module, and will also be relevant for those using other Roland V-Drums modules which have direct out USB Audio and MIDI recording capabilities (eg the TD-30).

    The ability to record Audio and MIDI via USB direct from the Roland TD-25 module to your DAW is an excellent feature, very useful for having options later to, say, playback the recorded MIDI through EZDrummer, Addictive Drums, or SSD, etc.

    However, like me, you may have had some unexpected results when recording Audio and MIDI simultaneously when using Studio One’s Takes to Layers functionality, which this article will help you address.

    The problem with Studio One’s Takes to Layers is that it treats Audio and MIDI in slightly different ways, which can be both confusing and frustrating until you understand what’s going on and how to work around its limitations. Additionally, Studio One’s various Record options are not very intuitive in the first place, which doesn’t help.

    Understanding how Studio One handles MIDI events

    The big difference between Studio One and other DAWs out there is that MIDI events in Studio One are not saved as separate .mid files, but are saved within the Studio One Song file itself. Therefore, having recorded some MIDI you won’t find any corresponding MIDI files in the browser Pool.

    The second issue – which I would say is an oversight by Presonus – is that MIDI events created via Record Takes to Layers do not get unique identifying event names, unlike Audio Takes which do. (I discuss how to deal with this in my Working with Studio One MIDI Events article.)

    Finally, Presonus has made some assumptions about how and why users record MIDI, which are not very helpful in the context of recording multiple MIDI takes from the TD-25 (or similar sources). I would say that the Instrument recording options (“Instrument” being the source generating the MIDI data, in our case the TD-25) have been designed primarily for those who want to build up complex MIDI parts within a single MIDI event, for example for those building up a drum part, recording first the kick, then the snare, then the hi-hats, etc. Clearly, this isn’t generally the way a user would want to record MIDI from a TD-25.

    Let’s cut to the chase

    The key to getting Record Takes to Layers to work as expected when recording Audio and MIDI simultaneously is to ensure that you have the correct Record Panel options selected. Specifically, it is the Record Panel’s Record Mode options which matter, as these affect both Audio and MIDI recording, and NOT the Instrument Loop Record options, which are only relevant when recording MIDI Takes within a continuously repeating Loop.

    What is this “Record Takes to Layers” you speak of?  Studio One has the capability of recording multiple takes of the same source on a single Track in the DAW, automatically recording each each Take to a new Layer for that Track. Although designed primarily for allowing easier comping of multiple takes into a single take, I find it quite useful for file management purposes and for decluttering the Studio One Arrange and Mix screens.

    To access the Record options mentioned earlier, we need to open the Record Panel (which is probably closed by default).

    Studio One Record Panel

    To open the Record Panel, click on the little spanner icon to the right of the Loop position markers (spanner icon circled in red in below screenshot):

    Studio One - How to open Record Panel

    Once the Record Panel is open, you should see something like this:

    Studio One - Record Panel

    The ONLY options of interest, in the context of simultaneously recording Audio and MIDI from the TD-25, are the Record Mode “Replace” and “Takes to Layers” buttons. You can ignore all the rest, although I always leave “Input Quantize” off, as I want to record exactly what I played, not a quantized version.

    Replace – This means that each take will overwrite the previous take. In the case of Audio, this isn’t important as a separate audio file is created and saved for each take (and will be available in the Pool for future use). All that will happen is that only the latest take will be visible in the Arrange window. However, for MIDI recording this option IS crucial:

    • Replace OFF – The MIDI data generated during each take will be added to the previously recorded data and stored in the same MIDI event. This is bad news if you’re recording multiple takes and you want to save each one individually.
    • Replace ON – Only the MIDI data generated from the latest take will be stored in the MIDI event. This is exactly what we want.

    Takes to Layers – As mentioned earlier, each take will be stored in a separate Layer associated with the DAW track in question. This is what we want, so this option should be on, ie activated.

    Instrument Loop Record has two options “Record Takes” and “Record Mix”, which can be toggled between. For our purposes, it makes NO difference which of the two is selected – it really doesn’t matter. Instrument Recording Tools options can also be ignored as they have no impact on what we are trying to do. I suggest leaving these deactivated.

    Which Record Panel options to use?

    Simple. To simultaneously record Audio and MIDI from the TD-25 to separate Layers of Audio and MIDI, make sure your Record Panel options are set up like this:

    Studio One - Record Panel - Best options for TD-25

    The key options are Replace and Takes to Layers, both of which must be activated. None of the Instrument Loop Record or Instrument Recording Tools options matter and can be safely ignored.

    IMPORTANT: I was a little unfair to Presonus earlier in this article as, frankly, part of the confusion I had suffered was due to me not understanding that the Record Mode Replace and Takes To Layers options apply to BOTH Audio and MIDI. I had wrongly assumed that they only applied to Audio  – which is not the case. I had also assumed that the Instrument Loop Record options applied to all MIDI recording, whereas in fact they ONLY apply to MIDI recording when in Loop mode. When not using a Loop, these options do not apply and can be ignored.

    Conclusion

    The Takes to Layers feature is really useful when recording Audio and MIDI simultaneously from the TD-25 into Studio One. However, if the correct Record Mode options are not selected, unexpected results can occur, which can be confusing and frustrating. Hopefully this article will avoid you having to suffer the same frustrations that I suffered until I figured this all out!

    To learn more about Studio One’s Record Mode options, check out my Studio One Record Mode Options Examples article, packed with useful screenshots to illustrate what each option does.

  • Muse Supremacy – Intro Clicks

    As promised in my Muse Supremacy Drumming Analysis page, I thought it would be interesting to look more closely at the Intro of this song to analyse its time signature, and see what that means in terms of setting up a click track in your DAW when playing along.

    Intro

    Essentially, the Intro consists of four “call and response” motifs, the “call” being 4 notes on guitar, and the “response” being 4 notes of drums/orchestra “answering” the guitar. To help better visualize this, which will be useful when looking at notation later on, I think of each call and response being something like this:

    ta-ta-ta-ta (pause) da-da-da-da

    with the guitar “call” being the “ta-ta-ta-ta” and the drums/orchestra “response” being the “da-da-da-da”.

    Time Signature

    There is more than one way to notate this song, my preference being to use 4/4 with a quarter note tempo of 80 bpm. This makes sense to me given the rock feel of the main drum beat in the song’s Choruses (kick on 1 and 3, snare on 2 and 4, 8th notes on hi-hat).

    For the Intro, although we could consider 4 measures of 3/4 with each measure being one call and response between the guitar and the drums/orchestra, this doesn’t feel right in terms of pulse, and therefore I prefer to notate this as 8 measures of 3/8, ie two measures of 3/8 for each call and response.

    Now, let’s complicate matters. We can also consider that there is a 3 over 2 polyrhythm happening here, with each call and response lasting 4 beats, rather than the 3 (one measure in 3/4) or 6 (two measures in 3/8). Here’s a screenshot to show want I mean. The track “CLK 4” (grey) is in 3/8 at 80 bpm per quarter note. The track “CLK 4 106” (yellow-ish) in in 4/4 but at a higher tempo, 106.67 bpm to be precise. However, you can see that these two clicks line up on the “1” of each measure of 3/8.

    Muse Supremacy - Intro Clicks and Time Signatures

    Remember, the music doesn’t change at all, but the two clicks (representing two different time signatures at different tempos) illustrate two ways in which we can feel the pulse in this part of the song.

    How the same piece of music can be felt two ways

    Let’s look at some notation in order to understand how this works. Each call and response (which is repeated 4 times in the Intro) consists of 4 notes on guitar, a pause, then 4 notes of drums/orchestra, ie something like this:

    ta-ta-ta-ta (pause) da-da-da-da

    In 3/8 time, each “ta” or “da” is a sixteenth note, with an eighth note rest between call and response:

    Muse Supremacy - Intro - Notation using 3/8 time signature

    Note: this is dummy notation, in other words ignore that I appear to have notated a snre cross-stick, it’s the note length that matters here for this discussion.

    In 4/4 time, each “ta” or “da” is an eighth note triplet, with a quarter note rest between call and response:

    Muse Supremacy - Intro - Notation using 4/4 time signature

    Calculating the 4/4 click

    Actually, this is just simple maths. We need to calculate the BPM for a 4/4 measure which needs to occupy exactly the same length of time as two 80 bpm 3/8 measures. In other words eight 8th notes at X bpm equals six 8th notes at 80bpm:

    80 bpm x 8/6 = 106.67 bpm

    Therefore, I created an audio file of a click at 106.67 bpm and added this to a new track in my DAW, and edited the audio regions so that it only plays during the Intro. For the rest of the song I use an eighth note click at 80bpm.

    Why bother?

    Good question! Well, it’s simply because I find it easier playing the Intro with this new 106.67 bpm click rather than an eighth note click at 80bpm. But it was also an interesting dive into anotehr aspect of music theory, and also a strong reminder that notation and music is exactly like writing about visual art. It’s do-able, but the language (or notation, in the case of music) is an approximation, attempting to convey something that can’t actually be conveyed fully in that medium.


    Check out other related content